Introduction
This is part four in a series of posts where I write about OAuth 2.0 & OpenID Connect. In this article we are going to have a look at the device authorization grant.
Part 0 - Terminology
Part 1 - An Introduction
Part 2 - Authorization Code Flow + PKCE
Part 3 - Client Credentials Flow
Part 4 - Device Authorization Flow
Part 5 - OpenID Connect Flow
This flow is an OAuth 2.0 extension defined in RFC 8628 that was designed for devices that either lack a browser or are otherwise input constrained to the extent that requiring the user to input text in order to authenticate during the authorization flow is impractial.
This extension enables OAuth clients on such devices to obtain user authorization by using a browser on a separate device, such as a smartphone.
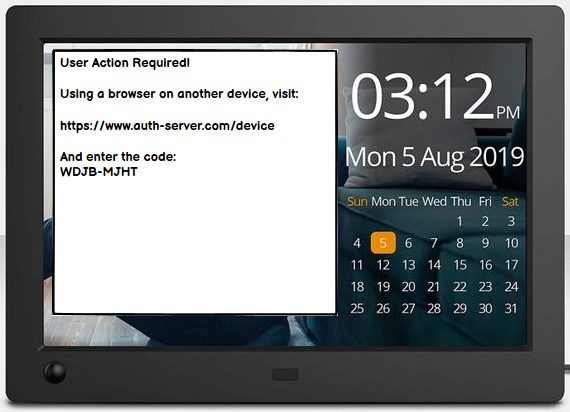
As an example think of a digital picture frame (client) that likes to access photos hosted on a photo sharing service (resource server) on behalf of the user (resource owner).
There are a couple of requirements that needs to be fulfilled for this flow to work. These are...
... the device needs to be connected to the internet
... the device is able to make outbound HTTPs requets
... the device is able to display a URI and a code sequence to the user
... the user has a secondary devices (e.g. computer or smartphone) from which he can process the request
Device Flow
Let's know walk to the flow step by step. This is what the high-level flow looks like (taken from RFC 8628).
      +----------+                                +----------------+
      |          |>---(1)-- Client Identifier --->|                |
      |          |                                |                |
      |          |<---(2)-- Device Code,      ---<|                |
      |          |          User Code,            |                |
      |  Device  |          & Verification URI    |                |
      |  Client  |                                |                |
      |          |  [polling]                     |                |
      |          |>---(5)-- Device Code       --->|                |
      |          |          & Client Identifier   |                |
      |          |                                |  Authorization |
      |          |<---(6)-- Access Token      ---<|     Server     |
      +----------+   (& Optional Refresh Token)   |                |
            v                                     |                |
            :                                     |                |
           (3) User Code & Verification URI       |                |
            :                                     |                |
            v                                     |                |
      +----------+                                |                |
      | End User |                                |                |
      |    at    |<---(4)-- End user reviews  --->|                |
      |  Browser |          authorization request |                |
      +----------+                                +----------------+
Step 1 - Device Authorization Request
The client requests access from the authorization server and includes its client identifier in the request and optionally a scope.
It does so by sending out a TLS-secured POST request to the device authorization endpoint.
RFC 8628 introduces a new endpoint, the
device authorizaion endpoint. This is separate from theauthorization endpointwith which the user interacts via browser (defined in RFC 6749).
This is what a request would look like.
POST /oauth2/devicecode HTTP/1.1
Host: www.auth-server.com
Content-Type: application/x-www-form-urlencoded

client_id=f2f007c5-b42b-4b89-b438-f4ad7e5610ea&
scope=photos.read
Step 2 - Device Authorization Response
The authorization server replies with a device_code, a user_code and a verification_uri. And also some other optional parameters.
As the device_code is not displayed to the user it should be long and as random as possible. This is for security reasons, as an attacker who guesses or brute forces the device code would be able to potentially obtain the authorization code once the user completes the flow.
Regarding the user_code generation the specification suggests to restrict the character set to case-insensitive A-Z characters with no digits. This is to enhance usability, as the user will very likely have to enter this code by a smartphone.
Also the verification_uri should be short and easy to remember as end users will be asked to manually type it into their browser.
This is what a device authorization response would look like.
HTTP/1.1 200 OK
Content-Type: application/json
Cache-Control: no-store

{
    "device_code": "GmRhmhcxhwAzkoEqiMEg_DnyEysNkuNhszIySk9eS",
    "user_code": "WDJB-MJHT",
    "verification_uri": "https://www.auth-server.com/device",
    "verification_uri_complete": "https://www.auth-server.com/device?user_code=WDJB-MJHT",
    "expires_in": 1800,
    "interval": 5
}
| Parameter | Usage | Description |
|---|---|---|
device_code |
Required | The device verification code |
user_code |
Required | The end-user verification code |
verification_uri |
Required | The end-user verification URI on the authorization server. |
verification_uri_complete |
Optional | A verification URI that includes the user_code |
expires_in |
Required | The lifetime in seconds of the device_codeand user_code |
interval |
Optional | The minimum amount of time in seconds that the client should wait between polling requests to the token endpoint. If no value is provided the, clients must use 5 as the default. |
Step 3 - User Interaction
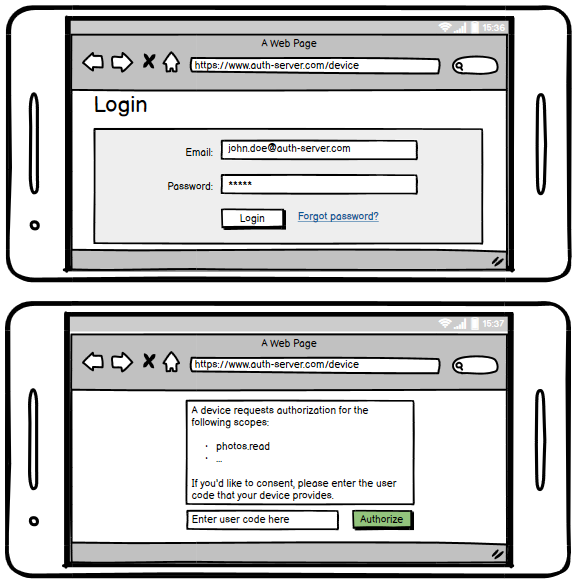
The client instructs the user to use a browser on another device and visit the provided end-user verification URI (verification_uri).
It also provides the user with the end-user code (user_code) to enter in order to review the authorization request.
Step 4
The authorization server authenticates the end user (via browser), and prompts the user to input the user code provided by the device client. The authorization server validates the user code provided by the user, and prompts the user to accept or decline the request.
Step 5
While the end user reviews the client's request (step 4), the client repeatedly polls the authorization servers token endpoint to find out if the user completed the user authorization step.
It includes the device_code issued in step 2 and its client identifier (client_id) in the request.
It will start polling after the amount of seconds provided by interval has passed (default 5 sec. if not provided). This is to prevent overloading the token endpoint.
The grant_type parameter must be set to urn:ietf:params:oauth:grant-type:device_code to indicate a device flow to the authorization server.
POST /token HTTP/1.1
Host: www.auth-server.com
Content-Type: application/x-www-form-urlencoded

grant_type=urn:ietf:params:oauth:grant-type:device_code&
device_code=GmRhmhcxhwAzkoEqiMEg_DnyEysNkuNhszIySk9eS&
client_id=f2f007c5-b42b-4b89-b438-f4ad7e5610ea
Step 6
The authorization server validates the device code provided by the client and responds with the access token if the client is granted access.
HTTP/1.1 200 OK
Content-Type: application/json;charset=UTF-8
Cache-Control: no-store
Pragma: no-cache

{
    "access_token": "eyJ0eXAiOiJKV1QiLCJu[...]",
    "scope": "photos.read",
    "ext_expires_in": 3599,
    "token_type": "Bearer",
    "expires_in": 3599
}
The client is now able to request the protected resource by presenting the access token in the authorization header.
GET /photos
Host: api.mindblowing-photosharing-service.com

Authorization: Bearer eyJhbGciOiJIUzI1NiIsInR5cCI6IkpXVCJ9.eyJpc3Mi[...]
Key take-aways
- This
device authorization grantwas optimized for devices that lack a proper input method - The user gives his consent to the requested scopes by a secondary device that is able to run a browser (mostly a smartphone)
- The device flow introduces a new endpoint, the
device authorization endpoint