Introduction
This is part two in a series of posts where I write about OAuth 2.0 & OpenID Connect. In this post we are going to have a look at the authorization code flow and at an extension which is called PKCE (RFC 7636).
Part 0 - Terminology
Part 1 - An Introduction
Part 2 - Authorization Code Flow + PKCE
Part 3 - Client Credentials Flow
Part 4 - Device Authorization Flow
Part 5 - OpenID Connect Flow
This type of OAuth flow was originally optimized for confidential clients, but with the beforementioned extension now can be used securely with public clients as well. The PKCE extension (Proof Key for Code Exchange) can be seen as the successor of the implicit grant flow as described in RFC 6749 Section 4.2.
It is probably the most common of the OAuth 2.0 grant types in use. And it can be used by SPAs (together with PKCE), Web Apps, Mobile and native/desktop apps as well.
Example Scenario
RFC 6749 provides an example that I'd like to use in a slightly modified variation throughout this article.
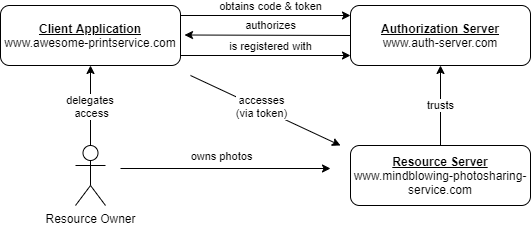
Let's assume that we (resource owner) are hosting our photos with a photo sharing service (resource server).
Now we would like to make use of an online printing service (client) and let it access our photo library without having to pass our service credentials (username and password of photo sharing service) to that printing service.
Our client is a confidential one in this situation, as it is a web application running on some server and therefor capable of keeping secrets. See Confidential vs. Public for more details on that.
Some more terminology
Before we can get to the flow in detail we need to introduce some more terminology. But it's not going to be that much, I promise! 😉
Authorization Code & Access Token
Okay, in part one of this series we talked about access tokens. An access token is a digital representation of the authorization given by the user. It acts as a proof to the resource server that the client is allowed to access the data.
Think of it as a tag, that gets attached to every resource request. In general every client in an OAuth grant flow uses access tokens to access protected data.
Now what's special about the authorization code grant that we are talking here, is that it introduces a temporary code. This temporary code is handed out by the authorization server to the client. Then the client exchanges this authorization code in a subsequent step for an access token.
The authorization code provides a few important security benefits, such as the ability to authenticate the client, as well as the transmission of the access token directly to the client without passing it through the resource owner's user-agent and potentially exposing it to others, including the resource owner (back channel vs. front channel).
It can be seen as a one-time-password and is basically a random string that doesn't encode any data. The specification doesn't prescribe any format the authorization code has to follow (as long as it can passed as a query parameter).
That's still confusing, I agree! 😒 For the moment just keep in mind that the authorization code is a temporary one that later get's exchanged for an access token, which in turn gives the client access to the resource.
Front & Back Channel
This two terms are important, as the authorization code flow uses both types of communication.
I first heard of this terms from Nate Barbettini who has been working for Oktadev and is a real master on OAuth, so kudos to him! 🖐 Have a look at his great youtube video here.
Front Channel
A
front-channelcommunication takes place when the communication between two or more parties is observable within the protocol. -- taken from ldapwiki.com
When adopting to the OAuth protocol this academic definition can be rephrased to:
A
front-channelcommunication takes place, when a request from the authorization server to the client is getting passed via the browser's address bar of the resource owner.
Compared to a back channel communication this is the less secure way to exchange data. It is technically possible that a malicious software (e.g. a browser extension) on the users machine could get hold of it.
However a front channel communication is needed when the protocol requires some user input, which is the case when asking for consent. It shouldn't be used to exchange sensitive information between the actors as we can't trust the browser with secret keys.
Back Channel
A
back-channelcommunication takes place, when the communication is not observable to at least one of the parties within the protocol. -- taken from ldapwiki.com
Rephrasing the above to fit into the OAuth protocol:
A
back-channelcommunication takes place, when data is exchanged between client and authorization server without involving the resource owners machine or browser.
Compared to the front channel communication this is the more secure way to exchange sensitive information between the client and authorization server. As it is always a server to server communication there is no way it can be tampered with from the users side (because the resource owners browser is not involved in it).
The authorization code flow
Let's now have a look at the steps involved. Please note that the following steps constitute the classic authorization code flow and doesn't make use of PKCE. I'd like to built up on this classic flow and later bring in PKCE.
Please note that the client application and resource server needs to be registered with the authorization server for this flow to work.
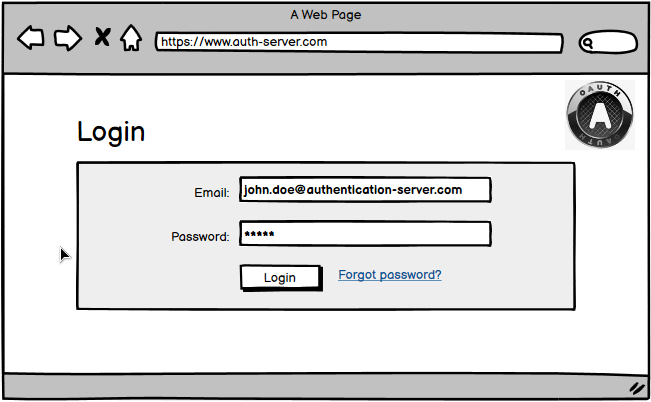
Step 1
The user (resource owner) browses to the website of the printing service (client) and authenticates with credentials managed by the client (as shown in the screenshot - [email protected] and not [email protected]).
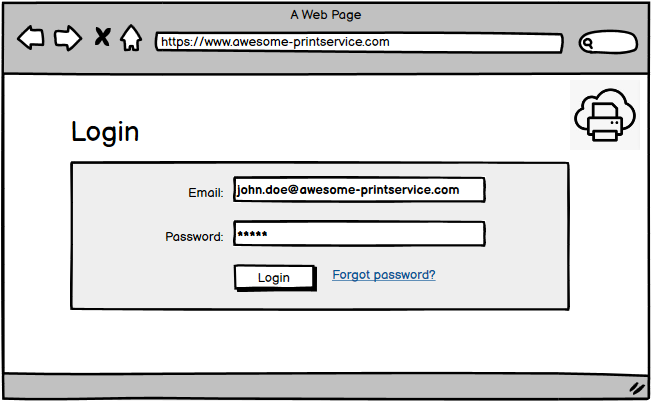
The credentials at this step could also be managed by an external identity provider (abbreviated IdP, Google for example). This can be confusing when learning OAuth.
In case the client offers logins with external identities, the client application has federated with an IdP, which is not the case in our example (see Federated Identity for more details on that).
Step 2 - Authorization Request
The user clicks on a button labeled something like Connect with "Photo Sharing Service XYZ"
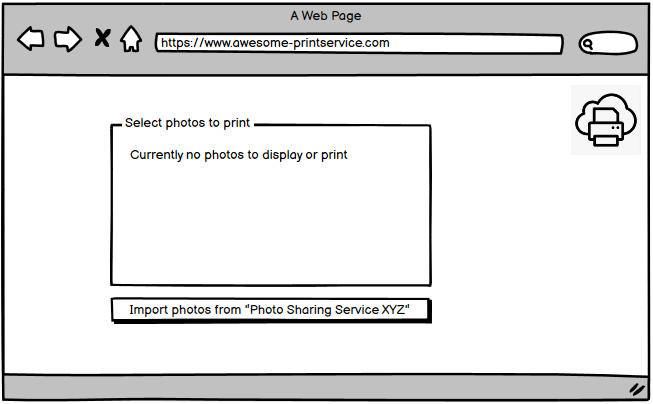
This click kicks of the authorization code flow and redirects the users browser to an URL at the authorization servers authorization endpoint (oauth2/authorize in our example).
This is what the authorization request and its parameters would look like.
GET https://www.auth-server.com/oauth2/authorize?

client_id=18f4ad63-01fa-41ae-b632-092a8f5d340b&
redirect_uri=https://www.awesome-printservice.com/callback&
scope=openid photos.read
response_type=code&
response_mode=query&
nonce=ugasq9v1bq&
Here is an explanation of the paramters in use.
| Parameter | Description |
|---|---|
client_id |
Identifies the client and is unique to the authorization server. |
redirect_uri |
Defines a callback that the users browser gets redirected to when handing out the authorization code. |
scope |
Defines a space delimited set of permissions that the client would like to get authorization for. In this case the client asks for read-only access to the photos (photos.read) and authentication (openid) |
response_type=code |
Tells the authorization server that the we are using the authorization code grant type. |
response_mode=query |
Defines the way the client expects to receive the authorization code. This can be query (code will be part of the URL), form_post (code will be part of the body in a POST message) or fragment. |
nonce=ugasq9v1bq |
A random value that is used to prevent replay attacks. Nonce stands for number used once. |
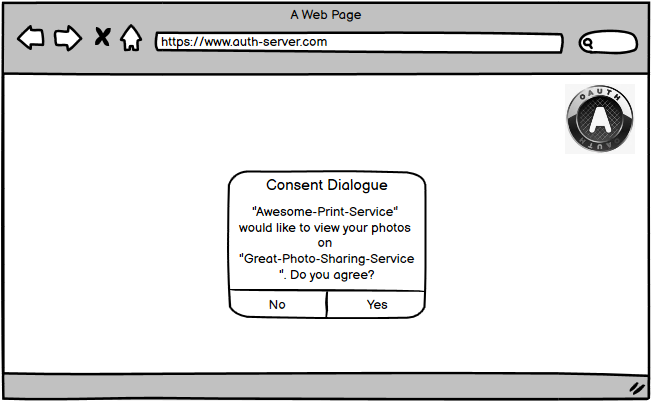
Step 3 - Asking for Consent
Next the user has to authenticate with the authorization server (if not already happened before).
The credentials the user enters here are managed by the authorization server!
After successful authentication the user gets presented a consent dialog. The user can accept or deny this authorization request after reviewing the requested scope.
Step 4 - Authorization Response
Assuming the user accepts the consent dialog, the browser gets redirected back to the URI that was provided via redirect_uri in the authorization request (step 2).
As the redirection URI now contains the authorization code, this exchange happens on the front channel.
GET https://www.awesome-printservice.com/callback?

code=0.AAAATGmc0-I5DEyAjxIt2i7cPAt90xhi0[...]
As the user passed response_mode=query to the authorization server (step 2) the client application gets the authorization code from the URI (transfered via HTTP GET).
Step 5 - Access Token Request
Now that the client has obtained the authorization code it needs to exchange it for an access token.
The client therefor sends an access token request to the authorizations servers token endpoint (oauth2/token in our example) including the authorization code.
As the client has to authenticate with the authorization sever it also passes along the encoded client credentials that contains the client_id and client_secret (HTTP Basic authentication schema).
Please note, that the access token request gets send on the back channel for security reasons, meaning the users browser is not involved.
This what the access token request would look like in our example. As it carries sensitive information its send via a POST and secured by TLS.
POST /oauth2/token HTTP/1.1
Host: www.auth-server.com
Authorization: Basic czZCaGRSa3F0MzpnWDFmQmF0M2JW
Content-Type: application/x-www-form-urlencoded

grant_type=authorization_code&
code=0.AAAATGmc0-I5DEyAjxIt2i7cPAt90xhi0[...]&
redirect_uri=https://www.awesome-printservice.com/callback&
| Parameter | Description |
|---|---|
grant_type |
Inform AS that this is authorization code flow request for an access |
code |
The authorization code |
redirect_uri |
Must be the same as in the initial authorization request |
You may find examples on the internet that include the
client_idandclient_secretparameter in the request body. However RFC 6749 does not recommend to include them in the body and instead stick to the HTTP Basic authentication scheme.
Step 6 - Access Token Response
Now the authorization server authenticates the client, validates the authorization code, and ensures that the redirection URI received matches the URI used to redirect the client in step 4.
If valid, the authorization server responds back with an access token and, optionally, a refresh token. Like the access token request this communication happens again on the back channel for security reasons.
This is what a successful response could look like.
HTTP/1.1 200 OK
Content-Type: application/json;charset=UTF-8
Cache-Control: no-store
Pragma: no-cache

{
    "access_token": "eyJ0eXAiOiJKV1QiLCJu[...]",
    "scope": "openid photos.read",
    "ext_expires_in": 3599,
    "token_type": "Bearer",
    "expires_in": 3599
}
Often the access token takes the form of a JWT (JSON Web Token) which is beyound the scope of this article. You can read more on this on Wikipedia.
Step 7
The client is now able to request the protected resource by presenting the access token in the authorization header.
GET /photos
Host: api.mindblowing-photosharing-service.com

Authorization: Bearer eyJhbGciOiJIUzI1NiIsInR5cCI6IkpXVCJ9.eyJpc3Mi[...]
Why the extra step?
Now why the heck this back and forth? Why does the client not directly request an access token? Why the extra step via authorization code?
You may have guessed it! It provides an additional layer of security. The authorization code flow combines the best things about the front channel and the back channel.
The protocol uses the front channel to interact with the user e.g. to parameterize the authentication and consent dialog.
And it uses the back channel to exchange the most sensitive data (access token) directly between authorization server and client. This way the token can never be intercepted from the users browser and any viruses that may run on that machine.
"But what if someone intercepts the network traffic and gets the authorization code? Wouldn't that person be able to exchange it for an access token?" you may ask.
This only holds true if that person also has knowledge of the client_secret, which hopefully is not the case. Otherwise it's of no use to that person.
Of course it's a different thing if some get's access to the client code...
Proof Key for Code Exchange
Okay great, now that we have an understanding of how the classic flow works, let's have a look at the PKCE extension, which is specified in RFC 7636 and gets pronounced pixy.
We have learned from the authorization code flow that it was originally developed and optimized for confidential clients.
But what if we'd like to delegate authorization to a public client? E.g for a mobile app or single-page-application (SPA) that runs entirely in the users browser? This type of client can not be (fully) trusted with sensitive information - such as a client_secret.
For such scenarios RFC 6749 introduced the implicit grant flow that got optimized for public clients in that it relies on the registration of the redirection URI and doesn't include any client authentication.
Unlike the authorization code grant type, in which the client makes separate requests for authorization and for an access token, the client receives the access token as the result of the authorization request.
The access token gets directly encoded into the redirection URI (front channel), and therefor may be exposed to the resource owner and other applications residing on the same device.
This doesn't mean the implicit flow is insecure in general, however there was room from improvement which came with the beforementioned extension...
PKCE was initially developed for mobile apps, but it turned out to be useful for every public client.
This extension makes it possible to securely do the authorization code flow on a mobile device or SPA without a secret, but still ensuring that someone else can't intercept the authorization code.
It does so by introducing something that can be called a dynamic client secret that protects the redirection step. So every time a client wants to initiate the authorization code flow, it just makes up a new secret.
Abstract Protocol Flow
This is what the abstract protocol flow looks like (taken from RFC 7636).
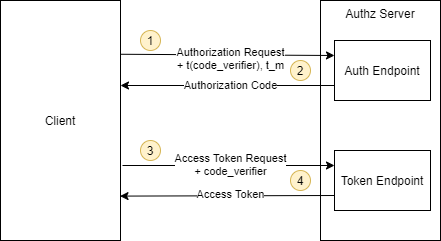
-
The client creates a secret (
code_verifier) and generates a hash of it (t(code_verifier)). It then sends that hash (calledcode challenge) in the authorization request along with the used hash algorithm (t_m). -
The authorization endpoint responds as usual but stores the hashed code verifier (
t(code_verifier)) and the hash algorithm (t_m). -
The client then sends the authorization code in the
access token requestas usual but includes the secret (code_verifier) generated at step 1. -
The authorization server hashes that
code_verifieragain and compares it to the hash from from step 2. If they do not match, access is denied!
An attacker who intercepts the authorization code at step 2 is unable to redeem it for an access token, as they are not in the possession of the "code_verifier" secret.
Summary
Again, that was a lot of stuff 👴. Let me summarize the points I find the most important ones.
Key take-aways
Authorization Code Flow
- The
authorization code flowwas optimized for confidential clients. I'd say it's the widely used OAuth 2.0 flow. - It exchanges the
authorization codeon thefront channeland the most sensitive information on theback channel(access token) - The Access Token Request is sent via TLS secured POST request as it carries the encoded
client_secret.
PKCE
- The
implicit grant flowwas originally developed for public clients, but found it's successor with the PKCE extension. - The PKCE extensions allows public clients to use the
authorization code flowin a secure way by introducing a code challenge. - A possible interception of the
authorization codecan not be used to exchange it for an access token.
Thanks for reading 👍 If you have any comments, questions or other feedback, please drop me a message 🖐