
Introduction
This is the third post in a series where I write about OAuth 2.0 & OpenID Connect. In this article we are going to have a look at the client credentials flow.
Part 0 - Terminology
Part 1 - An Introduction
Part 2 - Authorization Code Flow + PKCE
Part 3 - Client Credentials Flow
Part 4 - Device Authorization Flow
Part 5 - OpenID Connect Flow
This type of flow was introduced with RFC 6749 and is sometimes referred to as two-legged OAuth flow.
It is commonly used for server-to-server interactions that must run in the background, without immediate interaction of a user, where the client is typically a daemon service or a website. It's a much simpler flow then the others we have encountered so far.
The client credentials flow permits a confidential client to use its own credentials, instead of impersonating a user, to authenticate when calling another web service.
As an example think of a website (client) that likes to enrich it's content with a weather forecast provided by a protected weather service API (resource server). There is no human involved, when the website pulls that data.
Let's have a look at the sequence diagram.
Sequence Diagram
This is what the flow looks like. It's pretty basic compared to the authorization code flow, isn't it? 😎
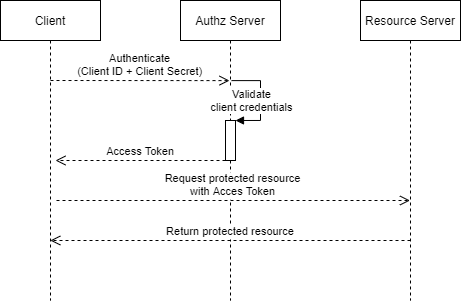
Step 1 - Authentication
The client initiates the flow by authenticating with the authorization servers token endpoint.
It does so by sending a POST request of which the body is protected with TLS in transit. The client_id and client_secret attributes are getting send in the header as a base64 encoded string (HTTP Basic Authentication, RFC 2617).
Authorization Servers like Microsofts Identity Platform can also accept certificates instead of a shared secret.
This is what an authentication request would look like:
POST /oauth2/token HTTP/1.1
Host: www.auth-server.com
Accept: application/json
Cache-Control: no-cache
Authorization: Basic eW91clfaWQ6eW91cl9jbGllbnRfc2VjcmV09jbGllbnR
Content-Type: application/x-www-form-urlencoded

grant_type=client_credentials&
scope=https://graph.microsoft.com/.default
It further passes two parameters along with it, which are grant_type and scope where the latter is optional.
| Parameter | Description |
|---|---|
grant_type |
Must be set to client_credentials to indicate the grant type |
scope |
The level of access to get an access token for |
Step 2 - Credential Validation
The authorization server validates the client_id and the client_secret, which implies that the client needs to be registered with the authorization server beforehand.
Step 3 - Access Token Response
If the credentials are valid the authorization server immediatly returns an access token. Please note that the access token response does not include a refresh_token.
As an example this is what an access token response could look like.
 HTTP/1.1 200 OK
 Content-Type: application/json;charset=UTF-8
 Cache-Control: no-store
 Pragma: no-cache

 {
   "access_token":"eyJraWQiOiJ[...]",
   "token_type":"Bearer",
   "expires_in":3600,
 }
Step 4 - Requesting Data
The client requests the protected resource by presenting the access token in the authorization header.
GET /weatherforecast
Host: api.weather-service.com

Authorization: Bearer eyJraWQiOiJ[...]
Step 5 - Validating & Response
After the resource server successfully validated the access token via the authorization servers introspection endpoint (or a cached public key) it will reply with the requested data.
Key take-aways
- The
client credentials flowis used for server-to-server interaction - The flow doesn't involve any user interaction (besides the one-time registration process done by an admin).
- Since client authentication is used as the authorization grant, no additional authorization request is needed.
- The authorization server will immediately return an access token upon successful authentication.