Introduction
With this blog post, I'll demonstrate how we can automatically register Ingress resources running on an AKS cluster with a public Azure DNS zone so they can be easily reached outside your cluster.
Further, I'll demonstrate how certificates can be automatically obtained from Let's Encrypt and then be assigned to those Ingress resources.
For that purpose, I'll use two Kubernetes controllers: ExternalDNS and Cert-Manager.
ExternalDNS for Kubernetes is a controller that automates the management of DNS records for Kubernetes resources by syncing them with various DNS providers, like Azure DNS zones.
On the other hand, Cert-Manager automates the management and issuance of SSL/TLS certificates for applications running within a Kubernetes cluster.
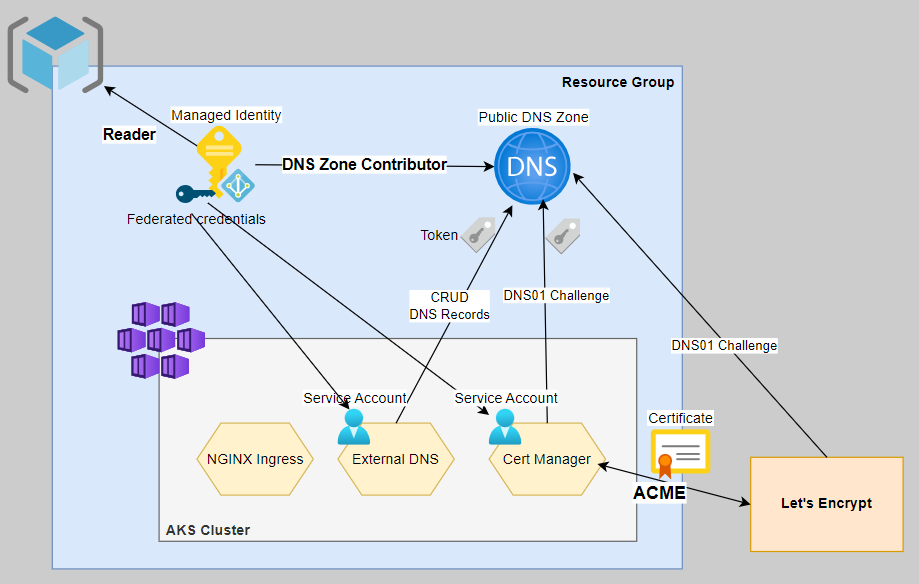
For enhanced security, I'll use a Managed Identity with federated credentials, which requires using the Workload Identity feature on my AKS cluster.

This setup comes with a couple of compelling benefits... 🏆
Why you want to automate DNS and certificate management
- End-to-end Automation: Combining ExternalDNS and Cert-Manager provides end-to-end automation for exposing services securely over the internet. Cert-Manager handles the issuance and renewal of SSL/TLS certificates, while ExternalDNS manages DNS records, ensuring that the services are secure and reachable.
- Reducing the risk of certificate expiration: Cert-Manager supports the great ACME protocol. Combined with a Certificate Authority like Let's Encrypt, it streamlines obtaining and renewing SSL/TLS certificates. This eliminates the risk of expired certificates!
- Self-Service Capabilities: Developers can use annotations on Ingress resources to define DNS and certificate requirements for their services. This empowers development teams to manage their service configurations within established policies, reducing the burden on central IT or operations teams.
- Logging and Auditing: Both tools provide logging and auditing capabilities, making monitoring and tracking changes to DNS records and certificates easier. This is valuable for compliance, troubleshooting, and security purposes.
By combining Cert-Manager and ExternalDNS, we create a robust and automated solution that ensures our Ingress resources are secured with up-to-date certificates and that DNS records are always synchronized with the underlying services.
This approach greatly simplifies the operation of an Azure Kubernetes Cluster and helps accelerate the development cycle of developers using the Azure Kubernetes Service. 🚀
High-Level Steps ✍🏼
These are the high-level steps. I assume you already have an AKS cluster and Azure DNS Zone deployed. Also, I assume you have a running NGINX Ingress Controller setup.
- Enable Azure AD Workload Identities on AKS Cluster.
- Create and configure a Managed Identity and assign the required privileges.
- Install and/or configure NGINX Ingress Controller
- Install and configure External-DNS.
- Install and configure Cert-Manager.
Now that the context is set let's get to work👷🏽♂️🚧
Steps
Enable Azure AD Workload Identities
First, we must update our existing AKS cluster to support workload identities. Make sure your Azure CLI is least on version 2.47.0 or later.
az aks update `
  --name <cluster-name> `
  --resource-group <cluster-rg> `
  --subscription "<subscription>" `
  --enable-workload-identity `
--enable-oidc-issuer💡 What is Azure AD Workload Identity?
Azure AD Workload Identity with AKS is a feature that bridges Kubernetes-native service accounts to Azure AD identities. This mapping allows a service account to access Azure AD-protected resources.
Afterward, we need to retrieve and store the issuer URL. The URL comes in the form of https://westeurope.oic.prod-aks.azure.com/<some-guid>/<another-guid>/.
$issuerUrl = az aks show `
  --name aks-azureblue `
  --resource-group rg-kubernetes `
  --subscription "<subscription>" `
  --query oidcIssuerProfile.issuerUrl `
--output tsvCreating and configuring a Managed Identity
Let's start by creating and storing the Managed ID in the same resource group as the AKS cluster (YMMV).
Alternatively, you can reuse the existing one named <cluster-name>-agentpool. This gets deployed into the infrastructure resource group at cluster-creation time. For this article, I'll create a dedicated one.
az identity create `
  --name id-aks-azureblue-workload-identity `
  --resource-group rg-kubernetes `
  --subscription "<subscription>"
Configure Federated Credentials
Now that the managed identity is in place, we must configure the federated credentials.
Later, we will install ExternalDNS and cert-manager on the Kubernetes cluster. Each of the helm charts will create a separate service account, which means we have to create two federated credentials to map both service accounts to the managed identity.
Let's start with the federated credential for the ExternalDNS service account, which will live in a namespace with the same name. The subject parameter follows the following format: system:serviceaccount:<namespace>:<serviceaccountname>
az identity federated-credential create `
  --identity-name id-aks-azureblue-workload-identity `
  --name external-dns-credentials `
  --resource-group rg-kubernetes `
  --subscription "<subscription>" `
  --issuer $issuerUrl `
--subject "system:serviceaccount:external-dns:external-dns"Okay, only one left for the cert-manager service account.
az identity federated-credential create `
  --identity-name id-aks-azureblue-workload-identity `
  --name cert-manager-credentials `
  --resource-group rg-kubernetes `
  --subscription "<subscription>" `
  --issuer $issuerUrl `
--subject "system:serviceaccount:cert-manager:cert-manager"Role Assignments
So far, so good. Now, it is time to equip the managed identity with some privileges.
Cert-Manager requires the DNS Zone Contributor role on the DNS Zone to create TXT records (DNS-01 challenge). This is needed to prove the ownership of the DNS domain to Let's Encrypt. You can read more about it here.
Then, ExternalDNS also requires extended privileges on the DNS zone to create and optionally remove A records at run-time. In my case, the DNS Zone is called dev.azureblue.io. In addition, ExternalDNS requires the Reader role to the resource group holding the DNS zone.
# Retrieve and store object id of managed identity
$assigneeObjectId = az identity show `
  --name id-aks-azureblue-workload-identity `
  --resource-group rg-kubernetes `
  --subscription "<subscription>" `
  --query principalId `
  --output tsv

# Retrieve and store id of dns zone
$dnsZoneId = az network dns zone show `
  --name dev.azureblue.io `
  --resource-group rg-kubernetes `
  --subscription "<subscription>" `
  --query id `
  --output tsv

# Retrieve and store id of resource group
$resourceGroupId = az group show `
  --name rg-kubernetes `
  --subscription "<subscription>" `
  --query id `
  --output tsv

# Assign the DNS Zone Contributor role on the zone
az role assignment create `
  --role "DNS Zone Contributor" `
  --assignee-object-id $assigneeObjectId `
  --assignee-principal-type ServicePrincipal `
  --scope $dnsZoneId

# Assign the Reader role on the resource group
az role assignment create `
  --role "Reader" `
  --assignee-object-id $assigneeObjectId `
  --assignee-principal-type ServicePrincipal `
--scope $resourceGroupIdCheckpoint ✅
Up until this point, we should have:
- ✅ Enabled workload identity on the existing AKS cluster
- ✅ Created and configured a managed identity
- ✅ Assigned the required roles
Until now, everything is configured on the Azure side, and we can move on to install the required Kubernetes components.
NGINX Ingress Controller Configuration
Ensure that your nginx-ingress deployment has the following argument added to it. This is required for ExternalDNS.
- --publish-service=<ingress-nginx-namespace>/<nginx-controller-service-name>I used the following steps to deploy ingress-nginx...
helm repo add ingress-nginx https://kubernetes.github.io/ingress-nginx
helm repo update
helm upgrade ingress-nginx ingress-nginx/ingress-nginx \
  --install \
  --namespace ingress-nginx \
  --create-namespace \
--values values.yaml... with this value file.
controller:
  service:
    annotations:
      service.beta.kubernetes.io/azure-load-balancer-health-probe-request-path: "/healthz"
    extraArgs:
      # Required for ExternalDNS
      publish-service: nginx-system/ingress-nginx-controller
Installing & Configuring ExternalDNS
Now that the Nginx Ingress Controller is properly configured let's install ExternalDNS.
This is the Helm Chart Values file I've used for configuration. Of course, replace the values accordingly.
fullnameOverride: external-dns
policy: sync
serviceAccount:
  annotations:
    azure.workload.identity/client-id: <your-client-id>
podLabels:
  azure.workload.identity/use: "true"
provider: azure
secretConfiguration:
  enabled: true
  mountPath: "/etc/kubernetes/"
  data:
    azure.json: |
      {
        "subscriptionId": "<subscription-id>",
        "resourceGroup": "rg-kubernetes",
        "useWorkloadIdentityExtension": true
}The configuration does a couple of important things.
serviceAccount.annotations: azure.workload.identity/client-id: ...&podLabels: azure.workload.identity/use: "true"enables workload identity for the service account used by ExternalDNS.policy: syncensures that the deletion of Ingress resources also results in the deletion of the corresponding A record.
The client ID can be retrieved as follows.
az identity show `
  --name id-aks-azureblue-workload-identity `
  --resource-group rg-kubernetes `
  --subscription "<subscription>" `
  --query clientId `
--output tsvNow, let's install the corresponding Helm Chart and ensure we use the correct namespace, as our previously created federated credential needs to match it.
helm repo add external-dns https://kubernetes-sigs.github.io/external-dns/
helm repo update
helm upgrade external-dns external-dns/external-dns `
  --install `
  --namespace external-dns `
  --create-namespace `
  --values values.yaml
Checkpoint ✅
Before moving on, testing that the ExternalDNS setup works as expected is advisable. So go ahead and deploy the following manifest to a namespace called demo. Of course, you need to adjust the Ingress resource according to your environment.
kubectl create namesapce demo
kubectl apply -f deployment.yaml
---
apiVersion: apps/v1
kind: Deployment
metadata:
namespace: demo
name: echo-deployment
spec:
replicas: 1
selector:
matchLabels:
app: demo
template:
metadata:
labels:
app: demo
spec:
containers:
- name: echo-pod
image: hashicorp/http-echo
args:
- "-text=Hello World!"
resources:
requests:
cpu: 100m
memory: 128Mi
limits:
cpu: 250m
memory: 256Mi
---
apiVersion: v1
kind: Service
metadata:
namespace: demo
name: demo-service
spec:
type: ClusterIP
selector:
app: demo
ports:
- port: 5678
---
apiVersion: networking.k8s.io/v1
kind: Ingress
metadata:
namespace: demo
name: demo-ingress
annotations:
nginx.ingress.kubernetes.io/ssl-redirect: "false"
nginx.ingress.kubernetes.io/use-regex: "true"
spec:
ingressClassName: nginx
rules:
- host: demo1.dev.azureblue.io
http:
paths:
- path: /(.*)
pathType: Prefix
backend:
service:
name: demo-service
port:
number: 5678 As can be seen from the manifest, we are creating a Deployment and a Service. Then, we expose it to the Internet through an Ingress using the hostname demo1.dev.azureblue.io.
As we haven't set up any certificates yet, disabling SSL-Redirection on the Ingress is important so it can be tested using the HTTP protocol.
After a few seconds, you should see an A and a TXT record in your public DNS zone. Navigating to http://demo1.dev.azureblue.io should display Hello World!.

As depicted in the screenshot above, the default TTL is 300 seconds. Optionally, this can be adjusted to your requirements by annotating the Ingress resource with external-dns.alpha.kubernetes.io/ttl: "valueInSeconds".
💡 The default TTL value of 300 seconds can be adjusted by annotating the Ingress with external-dns.alpha.kuberntes.io/ttl: "valueInSeconds"apiVersion: networking.k8s.io/v1
kind: Ingress
metadata:
namespace: demo
name: demo-ingress
annotations:
...
external-dns.alpha.kubernetes.io/ttl: "60"
spec:
...When configuring ExternalDNS, we used the parameter policy: sync, remember? This parameter keeps your DNS Zone in sync with your Ingress annotations.
If this isn't set, the default behavior is to upsert DNS record changes without deleting them if an Ingress gets deleted, leaving stale DNS records over time.
💡 To keep your Azure DNS zone in sync with your Ingress controller use the "policy: sync" setting.
So, let's also test that functionality and delete the previously created deployment (or only the Ingress resource).
kubectl delete namespace demoAfter a few seconds, the TXT and A record should be removed from the DNS zone.
Cert-Manager Installation & Configuration
Now that we have successfully automated the DNS registration process, we can get to automate the certificate management.
In a previous step, we prepared the Azure Managed Identity with a federated credential for Cert-Manager. Now, we need to enable it for the cert-manager deployment itself. This is done by the label azure.workload.identity/use: "true" that must be applied to the pod.
💡 The azure-workload-identity mutating admission webhook will only modify pods with this label to inject the service account token volume projection and Azure-specific environment variables (Microsoft, 2023).
Also, the following Custom Resource Definitions need to be installed.
ClusterIssuer,IssuerCertificateRequests,CertificatesChallengesOrders
So here is a basic configuration I've used with the official Helm Chart.
podLabels:
  azure.workload.identity/use: "true"
serviceAccount:
  labels:
    azure.workload.identity/use: "true"
installCRDs: "true" When installing, make sure to use the namespace cert-manager, since it needs to match the configured federated credentials in earlier steps.
helm repo add jetstack https://charts.jetstack.io
helm repo update
helm upgrade cert-manager jetstack/cert-manager \
  --install \
  --namespace cert-manager \
  --create-namespace \
--values values.yamlCreate Cluster Issuer
Now, we need to define an Issuer resource. These types of resources represent certificate authorities (CAs), which can sign certificates in response to certificate signing requests. We can create either one of the type ClusterIssuer or one of the type Issuer , which then will be scoped to a namespace.
Cert-Manager supports various types of issuers, such as HashiCorp Vault, Venafi, and others. Since the goal is to automate certificate management fully, I'll use one called acme.
Obviously, this issuer represents Certificate Authority servers implementing the Automated Certificate Management Environment (ACME) protocol, such as Let's Encrypt.
ACME requires a challenge to be solved to verify that we own the domain; details can be found in the link below. For this demo, I'll stick with the DNS01 challenge.
The following manifest will create two ClusterIssuers, one for the staging and another for the prod environment of Let's Encrypt.
You'll have to replace and adjust email, hostedZoneName, resourceGroupName, subscriptionId and clientId to your environment.
---
apiVersion: cert-manager.io/v1
kind: ClusterIssuer
metadata:
  name: letsencrypt-staging
spec:
  acme:
    server: https://acme-staging-v02.api.letsencrypt.org/directory
    email: <your-mail-address>
    privateKeySecretRef:
      name: letsencrypt-staging
    solvers:
    - dns01:
        azureDNS:
          hostedZoneName: dev.azureblue.io
          resourceGroupName: rg-kubernetes
          subscriptionID: <subscriptionId>
          environment: AzurePublicCloud
          managedIdentity:
            clientID: <clientId>
---
apiVersion: cert-manager.io/v1
kind: ClusterIssuer
metadata:
  name: letsencrypt-prod
spec:
  acme:
    server: https://acme-v02.api.letsencrypt.org/directory
    email: <your-mail-address>
    privateKeySecretRef:
      name: letsencrypt-prod
    solvers:
    - dns01:
        azureDNS:
          hostedZoneName: dev.azureblue.io
          resourceGroupName: rg-kubernetes
          subscriptionID: <subscriptionId>
          environment: AzurePublicCloud
          managedIdentity:
clientID: <clientId>After applying, make sure both are in a ready state.
kubectl get clusterissuer -o wide

NAME                  READY   STATUS                                                 AGE
letsencrypt-prod      True    The ACME account was registered with the ACME server   1h
letsencrypt-staging   True    The ACME account was registered with the ACME server   1h
Testing the setup with a demo deployment
Finally, we reached the point where we can test the entire setup. 🏆Go ahead and adjust the demo deployment to your environment, especially the hostnames from the Ingress resource.
---
apiVersion: apps/v1
kind: Deployment
metadata:
  namespace: demo
  name: echo-deployment
spec:
  replicas: 1
  selector:
    matchLabels:
      app: demo
  template:
    metadata:
      labels:
        app: demo
    spec:
      containers:
      - name: echo-pod
        image: hashicorp/http-echo
        args:
          - "-text=Hello World!"
        resources:
          requests:
            cpu: 100m
            memory: 128Mi
          limits:
            cpu: 250m
            memory: 256Mi
---
apiVersion: v1
kind: Service
metadata:
  namespace: demo
  name: demo-service
spec:
  type: ClusterIP
  selector:
    app: demo
  ports:
    - port: 5678 # The port that will be exposed by this service
---
apiVersion: networking.k8s.io/v1
kind: Ingress
metadata:
  namespace: demo
  name: demo-ingress
  annotations:
    nginx.ingress.kubernetes.io/ssl-redirect: "true"
    nginx.ingress.kubernetes.io/use-regex: "true"
    cert-manager.io/cluster-issuer: "letsencrypt-prod"
    external-dns.alpha.kubernetes.io/ttl: "60"
spec:
  ingressClassName: nginx
  tls:
    - hosts:
        - demo1.dev.azureblue.io
      secretName: demo-tls
  rules:
    - host: demo1.dev.azureblue.io
      http:
        paths:
          - path: /(.*)
            pathType: Prefix
            backend:
              service:
                name: demo-service
                port:
                  number: 5678
After applying, give Cert-Manager some time to solve the DNS01 challenge. It will create a secret called demo-tls for you, holding the certificate and private key for the Ingress.
kubectl describe secret demo-tls -n demo

Name:         demo-tls
Namespace:    demo
Labels:       controller.cert-manager.io/fao=true
Annotations:  cert-manager.io/alt-names: demo1.dev.azureblue.io
              cert-manager.io/certificate-name: demo-tls
              cert-manager.io/common-name: demo1.dev.azureblue.io
              cert-manager.io/ip-sans:
              cert-manager.io/issuer-group: cert-manager.io
              cert-manager.io/issuer-kind: ClusterIssuer
              cert-manager.io/issuer-name: letsencrypt-prod
              cert-manager.io/uri-sans:

Type:  kubernetes.io/tls

Data
====
tls.crt:  5534 bytes
tls.key:  1675 bytes
Eh voilà!! 🎉🎊🥂

Recap & conclusion
- With ExternalDNS, we can customize the TTL value by using an annotation
external-dns.alpha.kuberntes.io/ttl: "valueInSeconds" - ExternalDNS can be configured to keep the Azure DNS zone tidy. The relevant parameter is called
policy: sync. - There are two major ACME challenge types to prove ownership of a domain. These are HTTP01 and DNS01. Both come with pros and cons. Here, we have been using the DNS-01 challenge type.
- We created a Managed Identity and configured federated credential, so that the two Kubernetes service accounts (cert-manager and external-dns) can be authorized and authenticated against Azure services (Azure DNS zone in our case)
- Automating DNS & certificate management reduces the burden of manual tasks carried out by your platform team 😎
Thanks for reading. As always, feedback is welcome!
Happy hacking! Matthias 🤓
Further reading

 kubernetes-sigs